
Last Updated on February 6, 2023
Trampoline disassembly is the reverse process of installing a trampoline. However, taking apart a trampoline is easier and takes a shorter time than assembling it. Taking off trampolines is necessary for a few specific reasons. In some cases putting down a trampoline may be a reason to enhance the lifespan of your trampoline. As a trampoline user, you need to learn how to disassemble a trampoline.
There are numerous trampoline disassembly services available, but you need to acquire the technique to avoid critical situations or try it as a DIY task. So, we’ll share our knowledge about how to take apart a trampoline even if that is an adult sized-one. If you’re eager to get the exact guidelines, then keep scrolling!
Everything About How to Disassemble A Trampoline

Sometimes you need to disassemble your trampolines, otherwise, there is a chance of being damaged by your favorite equipment. The method is quite easy, and you can complete the task with the help of a few basic tools. We will explain the method elaborately. Before that, you need to know why and when to dismantle the trampoline.
Table of Contents
Why Disassembling Trampoline Is Necessary?
While you live in a year-round mild climate or tropical region, then you needn’t disassemble the trampoline. In this case, you needn’t worry about trampoline disassembly or reassembly. You just need there some basic care and maintenance to run it well.
But if the weather is harsh like unyielding summer heat or heavy snow, then you might take down your trampoline to winterize and store it in a safe place for increasing its lifespan. The dismantling process is also helpful before upcoming storms or hurricanes. It will worthwhile because it prevents the trampoline from blowing out.
Extreme cold and damp weather is a potential threat to form rust in the frame and springs that can deteriorate them soon. Falling snow is also a hazard for the mat. Likewise, warm summer weather can be a cause of breaking down the trampoline soon.
These situations make the trampoline dangerous and an eyesore. To get rid of these, you can disassemble the parts and keep them inside like an indoor trampoline.

The dismantling process will help you largely when you want to move and relocate your trampoline in a safe place. Trampoline disassembly is essential when you want to sell your trampoline. Truly, trampoline disassembly is performed for these reasons to avoid spending extra money.
So, let’s learn properly how to take down a trampoline for winter or summer.
Step-by-Step Trampoline Disassembling Instructions
Step 1: Preparations and Tools

Before starting trampoline disassembly, you need some basic preparation. You can call a partner to help in this task but don’t allow kids. Trampoline manuals are indeed a good resource in this regard. Read and follow the instructions for successfully completing the project.
Before dismantling the trampoline, you can take a few moments to clean the trampolines and prepare where you are going to store trampoline parts. Also, clean the trampoline boxes that hold all the parts.
Some tools and accessories are essential for dismantling the trampoline. Most of them come with the trampoline purchase. If you’ve lost anyone then buy them before taking apart the trampoline. Trampoline disassembly tools and accessories include:
- Spring puller
- Phillips head screwdriver or 10mm spanner
- Electric drill
- Hand gloves
Spring Puller/Trampoline Hook
The spring puller or trampoline hook is a very handy tool for both assembling and disassembling a trampoline. The puller comes with an ergonomic design and is made of metal. The handle is made of plastic and has finger grooves on it. So, you can use it with a perfect grip.
It is a very available tool and you can get it from your nearby store or from online (you can also unlock online trampoline games nowadays). It is better to know that, you can get the puller as a pair or as a single one. But we will suggest getting a pair. For your convenience we giving suggestions for both options.


Besides, removing the springs, this tool comes in handy for taking away the anchors from your trampoline. Spring puller also helps you measure the spring and replace it. You can also use spring as a puller. If you can do that, you will successfully know how to remove trampoline springs without a tool.
Hand Gloves
While disassembling the trampoline (even for a small indoor model) you should wear hand gloves for better efficiency and safety. There are various types of hand gloves. But you should go for working hand gloves in this regard. You can choose double-coated work gloves that will help you with various chores.
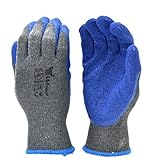
Many people may think if gloves are really necessary. Well, it is always better to use them. Since they will prevent your hands from wounds, dirt, and other things. Besides, the frame and springs are metal objects and can hurt you at any time. So, safety measures are to be taken.
Screwdriver & Spanner
You will need to unscrew and loosen some nuts from the pole and frame (so that you don’t have to repair it) depending on your trampoline. It is better to have both a head screwdriver and a 10mm spanner. You would not like to look for appropriate tools in the middle of the task.
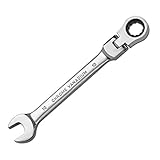
For screwdrivers, you can buy the specific sized ones if you know the size of the screws. But we will like to address that since you are a trampoline lover you will possibly change and upgrade the trampolines in the future. You will assemble and disassemble them sometimes. Therefore, you should buy a complete set so that you can do most of the tasks easily. And, here is a budget option for you.
No products found.
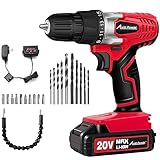
Electric Drill
If you can avail of an electric drill it will help you do the job more quickly and easily. But not all trampolines need an electric drill to disassemble them. Therefore, if you have the plan to upgrade the trampolines very often and are willing to assemble and disassemble them on your own, you can surely think to have an electric drill.
The trampoline spring puller helps to take apart the springs easily from the trampoline. There are also various trampoline spring tool alternatives that allow you to disassemble the springs quickly. Screwdrivers, Pliers, and Caulking guns are a few alternatives to the trampoline spring tool.
Whether you use a spring puller or any other alternatives make sure you know clearly how to use a spring puller. Otherwise, the stubborn springs may hurt you seriously.
So, get started with the disassembly process which is actually the opposite process of assembling the trampoline.
Step 2: Removing The Net, Ladder, and Other Accessories

First of all, you have to take apart the slackest parts such as the net, ladder, and additional accessories like tents, clubhouse, etc. The processes are easy actually. After taking apart the trampoline tent, and clubhouse, you can go disassemble the net.
If the net poles are directly attached to the frame, you can easily detach the poles. After detaching all the poles lay down them on the trampoline and untie the net from the top of the poles. Sometimes nets are attached to the bottom of the trampoline to add safety, you need to put down them too.
If there is a basketball hoop you need to untie it too. After finishing the net detachment you can fold it and keep it in the box. To protect the poles you can cover some wrapping tape around the poles.
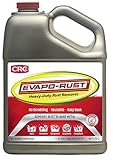
Now, you can take apart the ladder, just untie the ladder and keep it in the box. If there is rust or any debris formed, don’t forget to clean it. To clean the rust, you can use any of the rust removers.
But we will suggest you use one that is non-toxic and water-based. It may be difficult for you to find one in the first place. But don’t worry, we have already picked one for you. Check it out!
Step 3: Take Apart The Safety Cover

You can either remove the safety pad before or after the net disassembly. Most of the safety pads are single-piece construction and thin enough so you can easily remove them from the trampoline.
Untie the pads knots beneath the trampoline. If there is any fault found, mark it with duct tape so that you can repair it before using it the next year. A key might be helpful for untying stubborn knots. After untying all the knots fold the safety pad and keep it in the box.
Now, it’s time for dismantling the most tricky part i.e. springs.
Step 4: How to Remove Trampoline Springs: Disassembling The Springs
Many trampoline users frequently tell us, they enjoy trampoline assembling and removal tasks except the springs portion.
It’s true when you remove trampoline springs, you have to exert extra energy but if you learn and apply the right process of how to remove trampoline springs it will be easier for you to dismantle them.
So, let’s learn how to take springs off trampolines.
Begin with checking the condition of the springs. The health and no-rust springs allow you easily and smoothly remove them. But, removing the rusty or broken springs is absolutely a risky job. Wearing hand gloves is essential in this case.
Now, take your spring tool and choose any spring that you want to remove first. Then pull the spring hook at the mat end towards the trampoline center. The spring will be extended, so loosen it from the V-ring of the mat. At the same time, take apart the other spring hook from the frame.

After completing your first hook removal, you can disassemble all other trampoline springs in a similar way. If you don’t get enough leverage on the spring puller or want quick removal then you can also use the spring to take away the springs.
You need to know some basics before going for disassembling the spring. then you will easily learn how to remove trampoline springs.
Trampoline springs consist of two end styles. One is a closed-end that is hooked with the V-ring on the mat and another is an open-end that is clung to the frame. The open end helps to remove springs rapidly.
You just pull the spring hook attached to the frame towards your body and the spring will pop off easily. So, the process is fully reversed to use the spring puller.
There are also other options to remove trampoline springs fastly. A few of the trampoline spring tool alternatives are pliers, screwdrivers, and caulking guns. So, you learned the process elaborately on how to remove trampoline springs without a tool and with the tool. Now store all the springs in a box.
Step 5: Folding The Trampoline Mat

After removing the springs, your trampoline is nothing but a steel frame. The lovely jumping mat is already apart from the trampoline. Now, you need to fold the mat nicely.
To fold the mat, you have to straighten the mat on the ground. Then fold the trampoline half first. Again fold it in half and repeat the actions until it fits the storage box. Before folding the mat, you should check if there is any wear or tear in the mat. If you find any issue, you must repair the mat hole and then store it.
So, you have almost done the trampoline disassembly except for the frame. Now, the frame needs to be taken apart.
Step 6: Dismantling The Frame
 If you have experience in assembling a trampoline then you might already understand how to disassemble a trampoline frame. Here, your task is to unscrew, unscrew, and unscrew. The Phillip head screwdriver is the right companion in this regard. You can also use a power drill to remove the screws faster.
After completing the removal of the screws you need to detach the legs from the outer ring. Be careful about this job, otherwise heavy legs may fall on your feet and may hurt you. For avoiding injury you can stand in the middle of the leg and exert upward pressure on the outer ring to detach the legs.
When all the legs are detached, the outer ring is left to be disassembled. Now, dismantle the outer ring from the T-joints. You can do it by twisting the rings. Finally, you are capable of detaching the outer rings and T-joints. After that, store the outer rings, legs, and T-sections in the trampoline storage box.
Congratulations on successfully disassembling the trampoline!
Packing Up or Reinstalling The Trampoline
Our objective in disassembling the trampoline is to protect the trampoline from harsh weather or reinstall it in a new place.
 If you are a man, who disassembles the trampoline for protecting it from excessive snow or heat. Then, you won’t need to use it in the next six months minimum.
So, you can store all the parts in a safe and dry place. The steel parts must be kept inside otherwise they will be of no value for your dismantling.
On the other hand, if your purpose of disassembling the trampoline is to shift the trampoline to another place then you can do it easily now. Sometimes you need to move the trampoline a small distance.
In this case, you needn’t disassemble the trampoline. By following a few simple steps you can easily move your trampoline to the desired place.
Solving Trampoline Frame Stuck Together Issue
There are some reasons for happening this phenomenon. Those are:
- Rust may cause the issue
- Prolonged jumping hour
- Making the tight assembly
- When the frame is damaged
- Cold weather
- Metal defect of the trampoline
If this happens, you can try this to solve the problem:
- Apply any liquid grease or oil to remove the rust
- Hammer the joints afterward
- Loosen up the screws
- Change the damaged screws or trampoline parts
Questions on Trampoline Disassembling
How Long Does It Need to Take Apart A Trampoline?
Trampoline disassembly time depends on the size and style largely. Large sizes trampolines like the 15ft, 14ft, or 12ft ones take some time. But, 8ft or 10 ft models are comparatively easy and take less time.
Typically, spring-based trampolines need around 4 hours to dismantle. But, spring-less trampolines need fewer times. For example, the Springfree trampoline disassembly time is approximately 2 hours.
How To Take Apart A Rusty Trampoline?
Removing a rusty trampoline is absolutely challenging especially if you are a newbie. Firstly make sure, you wear gloves all the time. You need to follow a few instructions while taking down a rusty trampoline.
In the case of the rusty trampoline, you have to start by untying the safety pad. Then go for the springs. After removing the first spring, dismantle just its opposite one. Maintain the pattern until you take apart all the springs. Then focus on the frame.
Conclusion
Disassembling a trampoline is necessary for a few reasons. It will protect your trampoline from unwanted decay and might save you money like saving some money through buying a used trampoline. Be careful while dismantling the trampoline, especially the springs, and frames.
Always keep in mind, aggressive dismantling can damage your trampoline, so follow the above-mentioned instructions. An in-ground trampoline can’t be disassembled that easily.
Now, you know how to disassemble a trampoline. So, it’s your duty to teach these essentials to others. After winter reinstalls your trampoline for new games and fun!
Meet Gracie, a passionate trampoline enthusiast and dedicated trampoline instructor. As a sports student, Gracie’s knowledge of trampolining equipment is second to none. When she’s not hitting the books, you can find her bouncing high at her local trampoline club, sharing her love for the sport with children as their trusted coach.
Gracie’s articles are packed with valuable insights and tips to help you master the art of trampoline jumping.